Navigation and Deep Links in SwiftUI
With many websites now having a mobile app - we are seeing more apps featuring deep links. Deep Links are hyperlinks which when tapped or visited takes users to a specific piece of content in the app. For eg: If you tap on a link to someone's tweet on your iOS device, iOS opens up Twitter app, and takes you to that user's tweet. Deep links can be attached to a specific tab, a particular view or a section of page etc. In this article we will go over how to set up a URL scheme and then we will deep link tabs and specific detail page for content.
There are two ways to setting up deep linking. First and the easiest way is by using a URL scheme and the other way is using Universal links. Lets set up URL Scheme:
Its vital to understand how the url schemes look like: someappname://id. The someappname is the URL you add in Xcode. Then you have a colon : with two forward slashes //- after that you have the id tag. This id tag is what we will decode and use for navigation. Head over to Xcode and do the following:
- Click on the Project name
- Click Info
- Expand URL Types
- Add the name of your app or link in URL schemes text field
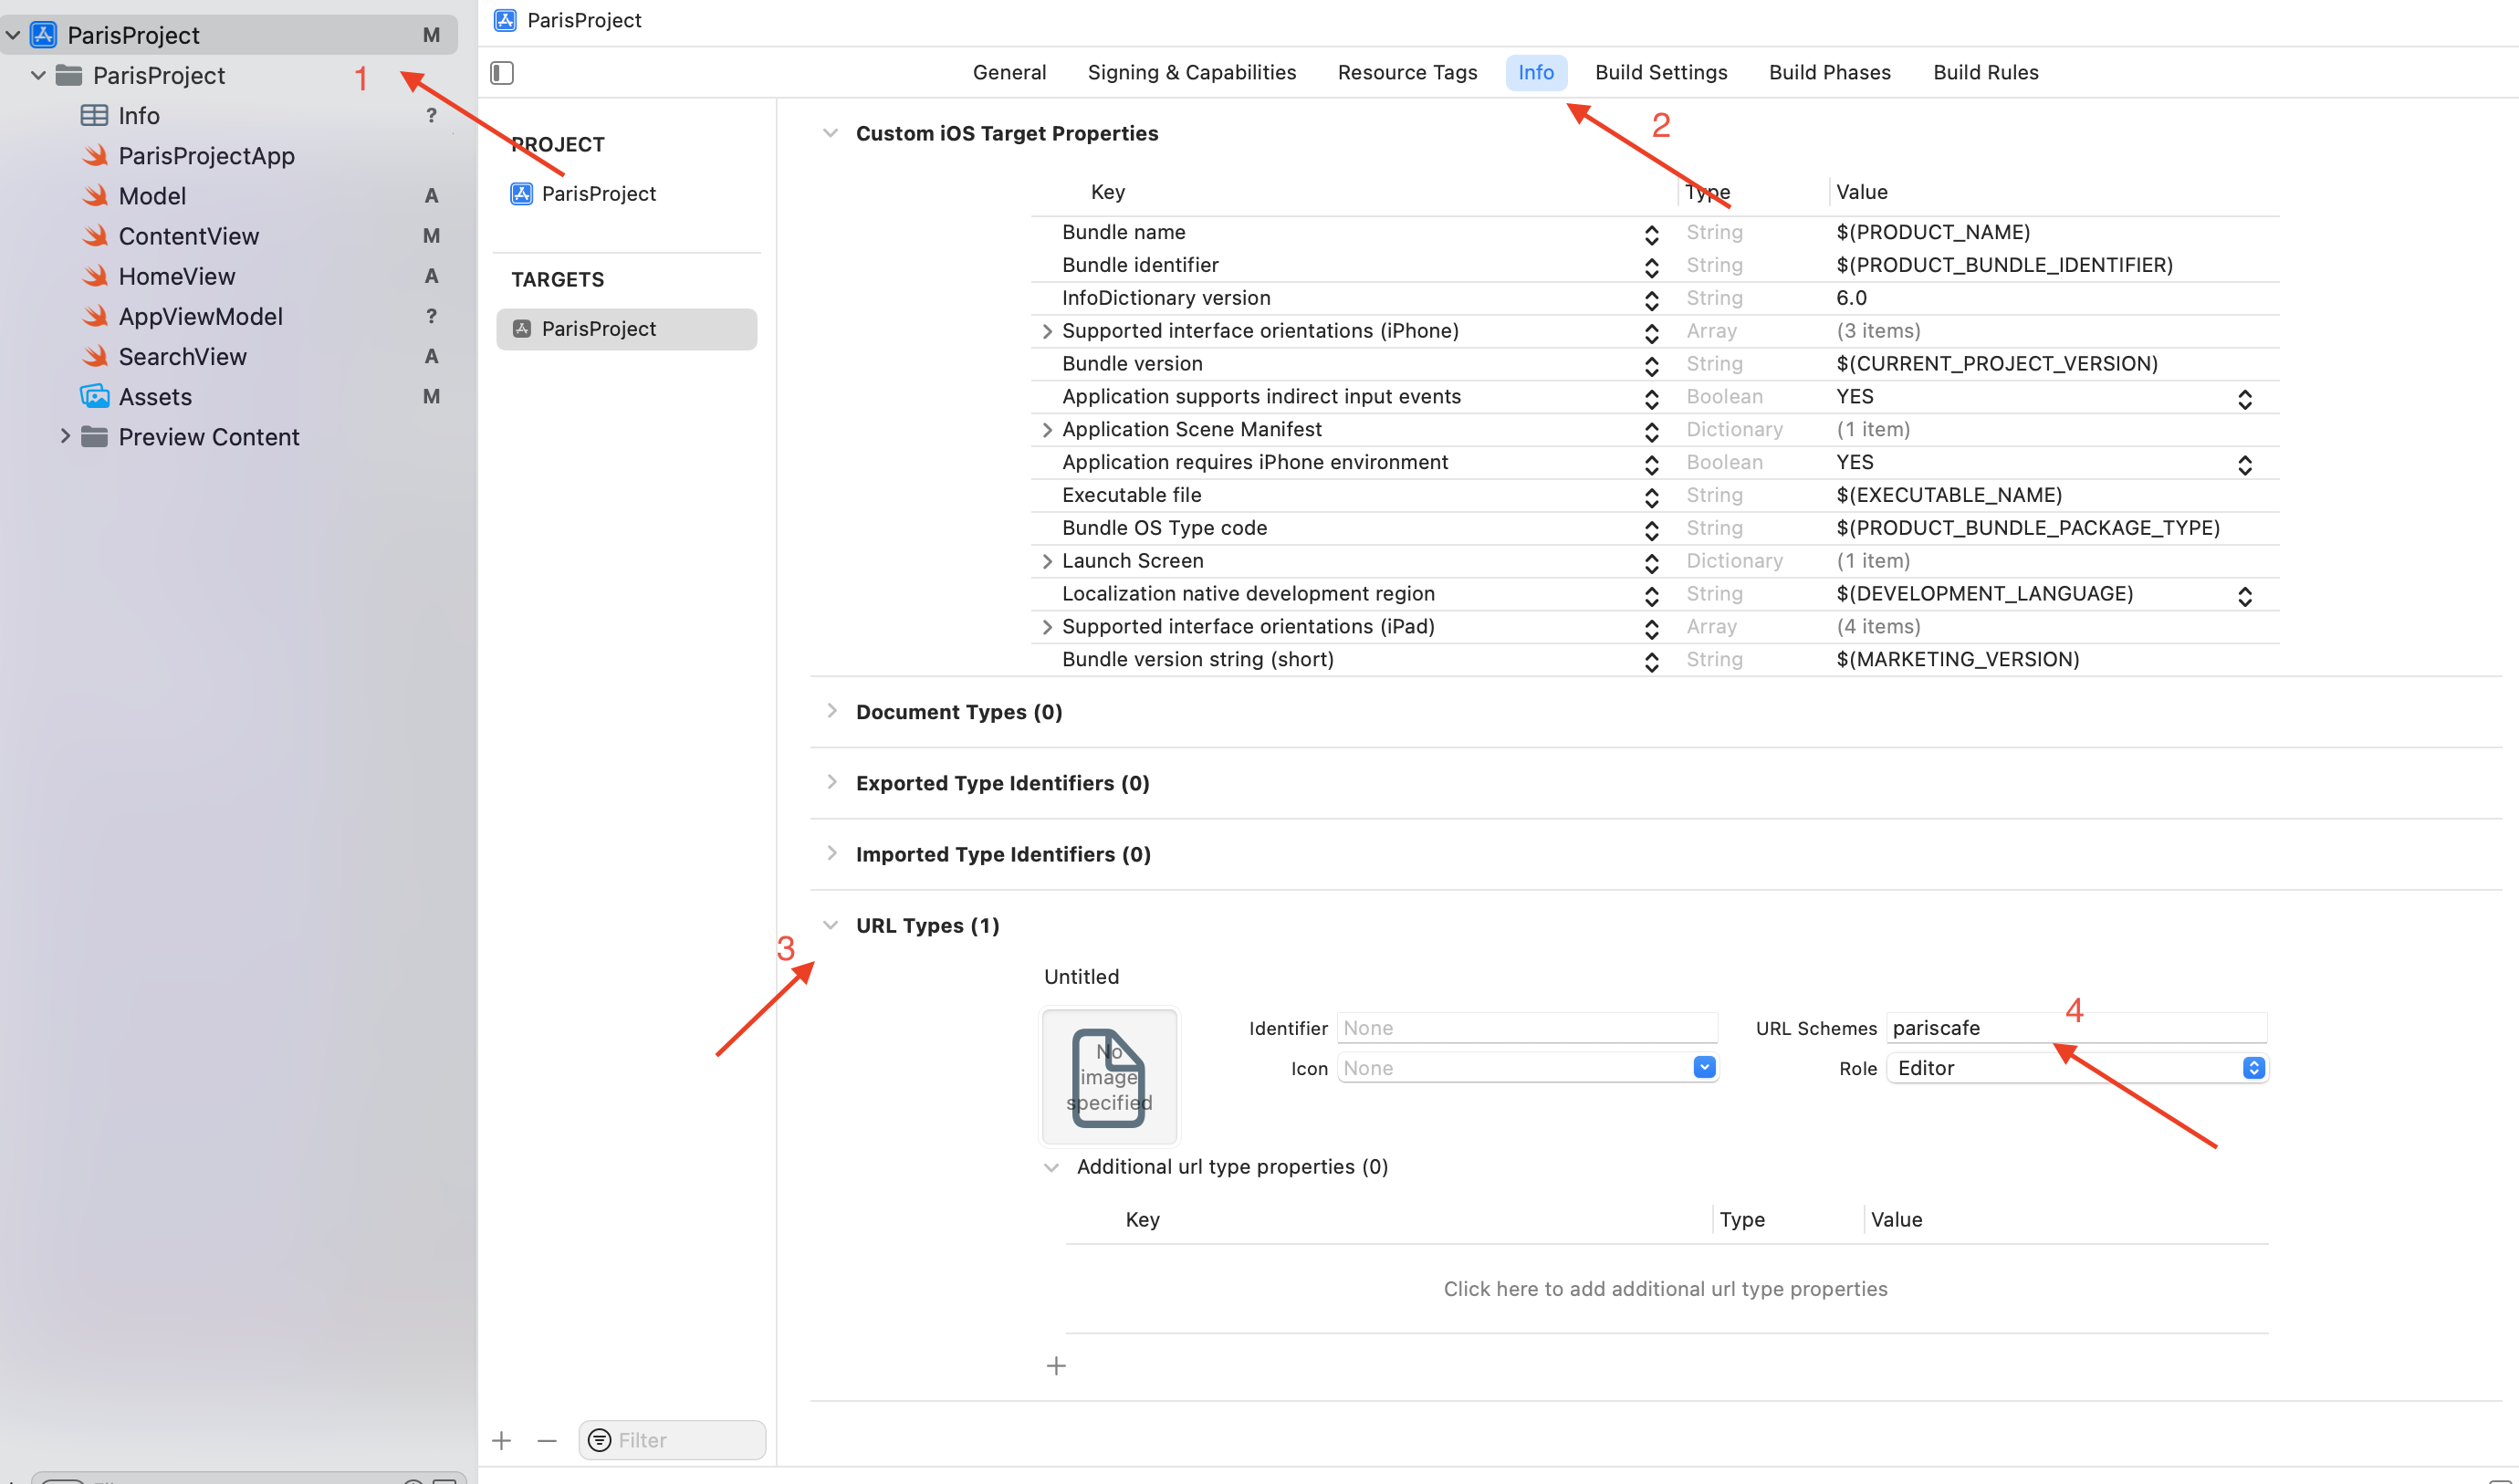
I have named my app pariscafe, so whenever we type pariscafe://search - it will take us to the search tab. And so on!
Data Model
Lets talk about the data model and an important property that you need to add in all the models that you want to support deep link. Here is the data model I will be using for this project:
struct ParisCafe : Identifiable{
    var id: String
    var name: String
    var rating: String
    var picture: String
}

class DataSource {
    static let data : [ParisCafe] = [ParisCafe(id: "PRS100", name: "Café de Flore", rating: "4/5", picture: "flora"),
                                    ParisCafe(id: "PRS101", name: "The Caféothèque of Paris", rating: "4.2/5", picture: "TheCaféothèqueofParis"),
                                    ParisCafe(id: "PRS102", name: "Cuppa - Salon de Cafe", rating: "4.3/5", picture: "cuppa"),
                                    ParisCafe(id: "PRS103", name: "Republique of Coffee", rating: "4.1/5", picture: "rofcoffee"),
                                    ParisCafe(id: "PRS104", name: "fringe", rating: "4.6/5", picture: "fringe"),
                                    ParisCafe(id: "PRS105", name: "Malongo Cafe", rating: "4.4/5", picture: "TheCaféothèqueofParis")]
}
As you can see the ParisCafe struct conforms to Identifiable protocol which makes it mandatory for us to add the id property. The id property is of type string. We will be implementing deep link in such a way that if the user writes the following hyperlink in Safari pariscafe://PRS103 then it should direct the user to our app and open the detail page for that particular cafe. So, id is extremely important for deep linking.
The Basic App Structure
Our app will consist of a tab view containing 3 tabs (Home, Search and Setting). Each of these tabs will be deep linked. In the Search view we will have a list of cafes and on tapping one should take you to a detail page for that cafe.
Before moving to the views lets look at enum ParisCafeTab which basically houses all the tab names.
enum ParisCafeTab: String {
    case home =  "home"
    case search =  "search"
    case setting = "setting"
}
Then we also have an ObservableObject called AppViewModel:
class AppViewModel: ObservableObject {
    @Published var currentTab: ParisCafeTab = .home
    @Published var currentDetailCafeID: String?

    func checkDeepLink(url: URL)->Bool {
        // more on this function later
    }

    func checkInternalDeepLinks(host: String)-> Bool {
      // more on this function later
    }
}
The ObservableObject just contains two Published properties - currentTab and currentDetailCafeID. Both these properties are used to track the current tab and the current detail page to be shown. We will be decoding the deep link and publishing changes to these properties which will update the view and take us to that specific piece of content. Since this is an ObservableObject we will be injecting it as an EnvironmentObject to the ContentView, so that we can access this anywhere in the app.
App.swift file
Lets start with ParisProjectApp swift file, here we are creating the AppViewModel() instance and injecting it in the ContentView and all its children views using .environmentObject function. Also here, we can see another modifier called .onOpenURL - this function is called every time we open the app using the deep link (with that convention as mentioned above). We pass that url to checkDeepLink function which we are yet to implement inside the ViewModel.
@main
struct ParisProjectApp: App {
    @StateObject var appVM : AppViewModel = AppViewModel()
    var body: some Scene {
        WindowGroup {
            ContentView()
                .environmentObject(appVM)
                .onOpenURL { url in
                    if appVM.checkDeepLink(url: url) {
                        print("got here from Deep link")
                    }else {
                        print("no deeplink found")
                    }
                }
        }
    }
}
In order to access the environment object in children views all we need to do is add the following line
@EnvironmentObject var appVM : AppViewModel.
ContentView
struct ContentView: View {
    @EnvironmentObject var appVM : AppViewModel
    var body: some View {
      MainTabViews()
    }
}
MainTabViews
struct MainTabViews: View {
    @EnvironmentObject var appVM : AppViewModel
    var body: some View {
        TabView(selection: $appVM.currentTab) {
            Text("Home")
                .tag(ParisCafeTab.home)
                .tabItem{
                    Image(systemName: "house.fill")
                }
            SearchView()
                .tag(ParisCafeTab.search)
                .tabItem{
                    Image(systemName: "magnifyingglass")
                }
            Text("Setting")
                .tag(ParisCafeTab.setting)
                .tabItem{
                    Image(systemName: "gearshape.fill")
                }
        }
    }
}
In this view, we are binding the TabView selection property to AppViewModel's published property of .currentTab. Each Tab has a tag which is gets from the ParisCafeTab enum. So if we need to select search tab, all we need to do is to assign appVM.currentTab to say ParisCafeTab.search and search tab will be selected.
SearchView
struct SearchView: View {
    @EnvironmentObject var appVM : AppViewModel
    @State var data = DataSource.data
    var body: some View {
        NavigationView {
            List {
                ForEach(data) { cafe in
                    NavigationLink(tag: cafe.id, selection: $appVM.currentDetailCafeID) {
                        DetailView(cafe: cafe)
                    } label: {
                        HStack {
                            Image(cafe.picture)
                                .resizable()
                                .aspectRatio(contentMode: .fit)
                                .frame(width: 150, height: 150)
                            Text(cafe.name)
                        }
                    }
                }
            }.navigationTitle("Search")
        }
    }
}

@ViewBuilder
func DetailView(cafe: ParisCafe)-> some View {
    VStack {
        Image(cafe.picture)
            .resizable()
            .aspectRatio(contentMode: .fit)
            .frame(width: 350, height: 350)
        Text("⭐️ Rating: ")
        Text(cafe.rating)
    }.navigationTitle(cafe.name)
}
In SearchView, we have two properties the appVM which is environment object and the data (array of type ParisCafe). Then wrapped by a NavigationView, we have a List iterating through the data array. Then we are grabbing the data of type ParisCafe, and creating a NavigationLink. NavigationLink will allow us to push to the detail view when the item is tapped. The label for the NavigationLink is just a HStack with an image of the cafe and the cafe name.
On tapping the list item, we will move to the DetailView. The DetailView is built using a ViewBuilder. Any function assigned with the keyword @ViewBuilder, allows you to return some kind of a view. So, inside this DetailView method, we are creating a simple view comprising of a VStack containing the image and rating of the cafe.
Do note that the NavigationLink is taking two parameters, id and selection. The id is the cafe item's id and the selection is binded to appVM.currentDetailCafeID. Both of these will be used with deep linking.
So now that all the views have been discussed, now lets get back to the AppViewModel and implement checkDeepLink and checkInternalDeepLinks methods.
Here is the complete AppViewModel class:
class AppViewModel: ObservableObject {
    @Published var currentTab: ParisCafeTab = .home
    @Published var currentDetailCafeID: String?

    func checkDeepLink(url: URL)->Bool {
        guard let deepLinkComponent = URLComponents(url: url, resolvingAgainstBaseURL: true)?.host   else {
            return false
        }
        print(deepLinkComponent)
        if deepLinkComponent == ParisCafeTab.home.rawValue {
            currentTab = .home
        }else if deepLinkComponent == ParisCafeTab.search.rawValue {
            currentTab = .search
        }else if deepLinkComponent == ParisCafeTab.setting.rawValue {
            currentTab = .setting
        }else {
            return self.checkInternalDeepLinks(component: deepLinkComponent)
        }
        return true
    }

    func checkInternalDeepLinks(component: String)-> Bool {
        if let index = DataSource.data.firstIndex(where: { cafe in
            return cafe.id == component
        }){
            currentTab  = .search
            currentDetailCafeID = DataSource.data[index].id
            return true
        }

        return false

    }
}
Lets first discuss checkDeepLink function. The checkDeepLink takes in the URL and we will get the components using URLComponents method. This URLComponents method should return us with the string after someappname://. So, essentially if you have the following URL scheme, someappname://search, deepLinkComponent should be assigned the value of search. We will use this string value and check which tab or NavigationLink item we should call.
Next, we will check if the deepLinkComponent is equal to any of the tabs tag name using the ParisCafeTab enum. If it is equal to any of the tab tag name, we will assign that enum case to the published property currentTab. So, if the app is opened using the following deep link pariscafe://home, it will invoke this function, and decode the string, if the string is equal to any of the enum cases, we will assign the currentTab published property to its respective enum case, causing the view to refresh and showing us the Home view.
Now, lets move on to more deeper internal links such as opening detail view using the cafe's id. If the decoded deepLinkComponent string is not equal to any of the tabs tag name, then we will call the checkInternalDeepLinks method. In this method, we will grab the index of the item in the data source whose id is equal to the component that is passed in as function parameter. Then we will first switch to the search tab since that is where we have the list of the cafes. We will then change the second Published property inside our view model which is currentDetailCafeID to the id of the cafe using the index we grabbed earlier.
This will basically refresh the search view and since the NavigationLink's selection argument has changed it will push to that item's detail view.
So if we write the following:
pariscafe://PRS104 - it will open the app, invoke the checkDeepLink method, since PRS104 isn't equal to any ParisCafeTab enum cases, it will invoke checkInternalDeepLink and pass PRS104 string. We will go through the data array and look for the index of the item with id of PRS104. That index will then be used to change the selection binding property (currentDetailCafeID), and we will have the detail page showing.

The full source code of this project is available on GitHub