How to Add Button to Navigation Bar in SwiftUI
How to customize the navigation bar with buttons and graphics using SwiftUI's NavigationView is the topic of this article. To do so, we'll make use of the navigationBarItems modification, which allows you to choose which items appear at the start and end of the bar (e.g., buttons, images or other SwiftUI views). Items with more prominence will be shown on the left side of the screen, while those with less prominence will appear on the right.
The following code will add an Edit button to the end of the navigation bar:
struct ContentView: View {
    var body: some View {
        NavigationView {
            Text("List of SwiftUI tutorials")
            .navigationBarTitle("Tutorials")
            .navigationBarItems(trailing:
                Button(action: {
                    print("Edit button pressed...")
                }) {
                    Text("Edit")
                }
            )
        }
    }
}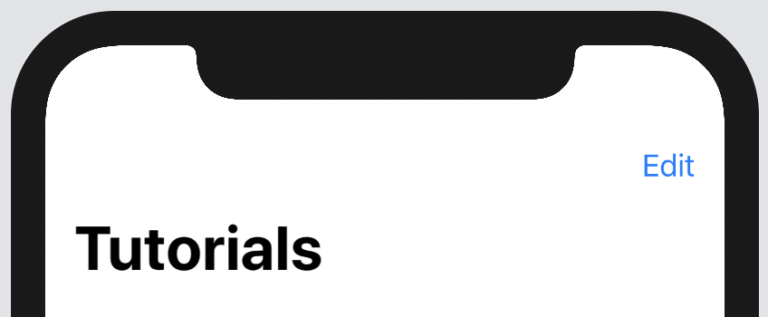
The navigationBarItems class's lagging edit button in the main menu
Create a primary Edit button for the toolbar:
.navigationBarItems(leading:
    Button(action: {
        print("Edit button pressed...")
    }) {
        Text("Edit")
    }
)
Insert a button with a trailing picture using an SF Symbol onto the menu bar:
.navigationBarItems(trailing:
    Button(action: {
        print("User icon pressed...")
    }) {
        Image(systemName: "person.crop.circle").imageScale(.large)
    }
)
Using navigationBarItems, add a lagging image button to the navigation bar.
HStack makes it easy to extend your menu bar with additional tacked-on buttons:
.navigationBarItems(trailing:
    HStack {
        Button(action: {
            print("Reload button pressed...")
        }) {
            Text("Reload")
        }
 Button(action: {
            print("Edit button pressed...")
        }) {
            Text("Edit")
        }
    }
}
This is how you can implement navigation in SwiftUI. Cheers!